
Choose an AI assistant above to request a concise summary of this cursive-reading guide.
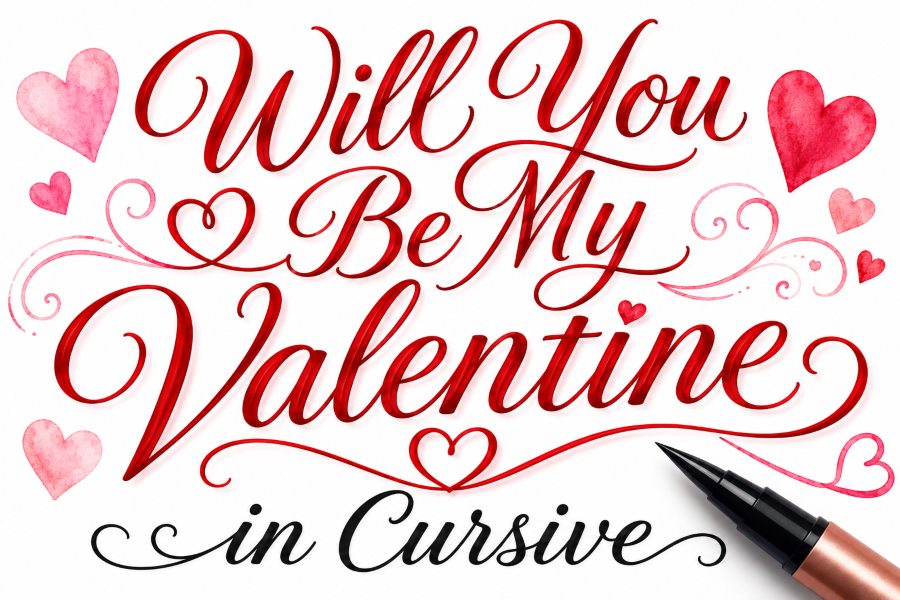
Writing “Will you be my Valentine” in cursive is a simple way to make a Valentine’s Day message feel more romantic, personal, and meaningful. Whether you are creating a handmade card, decorating a gift, writing a love letter, or preparing a Valentine’s Day sign, cursive writing can give the phrase a soft and elegant appearance.
You do not need to be a professional calligrapher to write this message beautifully. With a basic understanding of cursive letter connections, spacing, and stroke movement, you can create an attractive version of the phrase using an ordinary pen or pencil.
In this guide, you will learn how to write will you be my Valentine in cursive, how to connect each word correctly, which letters may require extra practice, and how to decorate the final message. You will also find practice tips, style ideas, and answers to common questions.
How Does “Will You Be My Valentine” Look in Cursive?
In cursive handwriting, the phrase is written with connected letters inside each word:
Will you be my Valentine?
The letters within each word usually remain connected, while clear spaces separate the words. The capital W in “Will” and the capital V in “Valentine” may be slightly larger or more decorative than the lowercase letters.
A handwritten cursive version should feel smooth rather than stiff. Each letter should lead naturally into the next one without requiring you to lift your pen repeatedly.
The phrase contains five words:
- Will
- You
- Be
- My
- Valentine
You may write the phrase on one line, split it across two lines, or place each word in a decorative arrangement. For example:
Will you be my
Valentine?
This two-line format works especially well on greeting cards, social media graphics, posters, and gift tags.
Why Write a Valentine Message in Cursive?
Cursive writing is often associated with handwritten letters, romantic notes, wedding invitations, and personal messages. Its flowing appearance makes it especially suitable for Valentine’s Day.
Typing a message can be fast and convenient, but handwritten cursive feels more personal. The small differences in your letter shapes, spacing, and strokes make the message unique.
Writing “Will you be my Valentine” in cursive can be useful for:
- Handmade Valentine’s Day cards
- Romantic letters
- Gift tags
- Scrapbook pages
- Classroom activities
- Valentine proposal signs
- Social media photographs
- Cake toppers
- Printable worksheets
- Wall decorations
- Wedding or engagement projects
Even simple cursive handwriting can make an ordinary piece of paper feel special.
Learn the Basic Cursive Letters First
Before writing the complete phrase, it helps to understand how individual cursive letters are formed. Some letters begin at the baseline, while others start with a taller upward stroke. Certain letters also have loops that extend above or below the writing line.
The phrase includes the following letters:
- Uppercase W
- Uppercase V
- Lowercase a
- Lowercase b
- Lowercase e
- Lowercase i
- Lowercase l
- Lowercase m
- Lowercase n
- Lowercase o
- Lowercase t
- Lowercase u
- Lowercase y
If you are new to joined handwriting, practice these letters individually before combining them into words.
You can also review this complete guide on how to write cursive letters to learn the basic strokes, uppercase forms, lowercase forms, and letter connections needed for smooth cursive handwriting.
How to Write “Will” in Cursive
The first word begins with an uppercase W.
Step 1: Write the Capital W
Start near the baseline and create a smooth upward stroke. Move down, rise again, and repeat the movement to form the main parts of the W. Depending on your preferred cursive style, the capital W may contain loops or rounded curves.
Avoid making the capital letter too wide. It should be larger than the lowercase letters but still fit naturally beside them.
Step 2: Connect W to I
After completing the final stroke of the W, allow the line to move directly into a lowercase i. Form a small upward curve, bring the line down, and finish with a short exit stroke.
Do not add the dot yet. It is usually easier to finish the word before returning to dot the i.
Step 3: Write the Two L Letters
Continue from the i into the first lowercase l. Create a tall loop reaching toward the upper writing line, then bring it back down to the baseline.
Repeat the same movement for the second l.
The finished word should read:
Will
The two lowercase l letters should have similar height and shape. Keeping them consistent will make the word look balanced.
How to Write “You” in Cursive
The word “you” contains three connected lowercase letters.
Step 1: Form the Lowercase Y
Begin at the baseline with a short upward curve. Move down and rise again to create the first part of the y. Then bring the stroke below the baseline to form the descending loop.
The lower loop should be smooth and narrow. Avoid making it so large that it touches another line of text.
Step 2: Connect Y to O
Bring the exit stroke of the y back toward the baseline and flow directly into a lowercase o. Create a rounded oval shape and close it near the top.
Step 3: Connect O to U
From the top of the o, continue into the lowercase u. Move down toward the baseline, curve upward, and repeat the movement before finishing with an exit stroke.
The completed word should look smooth and compact:
you
Make sure the o is clearly closed so it does not resemble another letter.
How to Write “Be” in Cursive
The word “be” is short, but the lowercase b may require practice.
Step 1: Write the Lowercase B
Begin at the baseline and make a tall upward loop similar to a lowercase l. Bring the stroke back down, then form a small rounded section on the right side.
The exact shape of a cursive b varies between handwriting styles. Some writers use a closed loop, while others use an open rounded form.
Step 2: Connect B to E
Let the final stroke of the b move directly into the lowercase e. Create a small loop and finish with a gentle exit stroke.
The completed word should read:
be
Keep the lowercase e open enough to remain recognizable.
How to Write “My” in Cursive
The word “my” combines a rounded lowercase m with a descending y.
Step 1: Form the Lowercase M
Start at the baseline with a short entrance stroke. Move upward and down to create the first rounded arch. Repeat the movement to form the second arch.
A lowercase cursive m usually has two humps. Keep them similar in size.
Step 2: Connect M to Y
Move from the final arch of the m directly into the lowercase y. Form the upper part at the baseline, then extend the final stroke below the line.
Add a smooth loop beneath the baseline before returning upward.
The finished word should look like:
my
Leave enough space after “my” because the following word, “Valentine,” begins with a large capital letter.
How to Write “Valentine” in Cursive
“Valentine” is the longest and most important word in the phrase. You may make it slightly larger or more decorative than the other words.
Step 1: Write the Capital V
Begin near the upper writing line. Move downward toward the baseline, then rise again with a smooth curve.
Some cursive styles use a looped capital V, while others use a simpler pointed form. Choose the version that feels comfortable and remains easy to read.
Step 2: Connect V to A
Allow the final stroke of the V to flow into the lowercase a. Create a small rounded oval, close it, and finish with an upward connecting stroke.
Step 3: Write L
Move into a tall loop for the lowercase l. Bring the stroke back down to the baseline without lifting your pen.
Step 4: Add E
Connect the l to a small lowercase e. Keep its loop open and rounded.
Step 5: Write N
Continue into a lowercase n. Create one smooth arch and finish with a connecting stroke.
Step 6: Form T
Write the lowercase t with a tall upward stroke, bring it down, and continue into the next letter. Leave the crossbar until the word is complete.
Step 7: Add I
Create the lowercase i using a short up-and-down movement. Do not add the dot immediately.
Step 8: Write N and E
Connect the i to another lowercase n, then complete the word with a lowercase e.
After finishing the complete word, return to cross the t and dot the i.
The final result should read:
Valentine
Try to keep the lowercase letters at a consistent height. The capital V and tall letters such as l and t should rise above the smaller letters.
How to Write the Complete Phrase
Once you have practiced each word, combine them into the complete message.
Follow these steps:
- Begin with a large capital W.
- Connect the remaining letters in “Will.”
- Leave a clear space.
- Write “you” in connected lowercase letters.
- Add another word space.
- Write “be.”
- Leave a small space and write “my.”
- Add a slightly wider space before “Valentine.”
- Begin “Valentine” with a decorative capital V.
- Add a question mark at the end.
Your final handwritten phrase should read:
Will you be my Valentine?
Do not rush while writing. A slow and steady movement usually creates cleaner letter connections.
Add a Question Mark
Because the phrase asks a question, include a question mark at the end.
A cursive question mark may look similar to a standard handwritten question mark. You can keep it simple or add a small decorative curve.
Place the question mark close enough to the word “Valentine” that it clearly belongs to the sentence, but do not let it touch the final e.
You may also turn the dot beneath the question mark into a small heart for a more playful Valentine’s Day design.
Choose the Right Writing Tool
The writing tool you choose can affect the appearance of your cursive message.
Pencil
A pencil is ideal for beginners because mistakes can be erased. Use a sharp pencil for clear strokes.
Ballpoint Pen
A standard ballpoint pen is suitable for everyday cards and notes. It produces consistent lines and is easy to control.
Gel Pen
Gel pens create smooth, dark strokes. Red, pink, purple, gold, or metallic gel pens can make the message feel more festive.
Brush Pen
A brush pen allows you to create thick downstrokes and thin upstrokes. It is a good option for modern calligraphy, although it requires more pressure control.
Fountain Pen
A fountain pen can give your cursive handwriting a traditional and elegant appearance. Test the ink first to make sure it does not bleed through the paper.
How to Make the Phrase Look More Romantic
Once the basic handwriting is complete, you can decorate the message.
Add a Heart Flourish
Extend the final stroke of the word “Valentine” and curve it into a small heart. Keep the flourish simple so the word remains readable.
Use Red or Pink Ink
Traditional Valentine’s Day colors can immediately make the phrase feel more romantic.
Outline the Capital Letters
Write the capital W and V normally, then add a second line beside the main strokes. This creates a decorative outlined effect.
Add Small Hearts
Place small hearts around the phrase, above the dots of the letters, or beside the question mark.
Use a Shadow Effect
Add a light shadow beside each letter using a gray marker or pencil. This can create a simple three-dimensional appearance.
Combine Print and Cursive
Write “Will you be my” in smaller printed letters and make “Valentine” large and cursive. This creates a strong visual focus.
Layout Ideas for Cards and Signs
You do not have to write the entire phrase on one straight line.
Traditional One-Line Layout
Write the complete phrase across the center:
Will you be my Valentine?
This works well for wide cards, banners, and posters.
Two-Line Layout
Place the sentence across two lines:
Will you be my
Valentine?
Make “Valentine” larger than the first line.
Three-Line Layout
Use a centered arrangement:
Will you
be my
Valentine?
This format works well for square cards and social media posts.
Heart-Shaped Layout
Arrange the words around the outline of a heart. This layout requires careful planning, so draw the heart lightly in pencil first.
Minimal Layout
Write only the phrase in the center of a blank card. Use one small heart beneath it for a clean and modern design.
Common Mistakes to Avoid
Even a simple phrase can become difficult to read when the letters are rushed or uneven.
Connecting Separate Words
Only connect letters within the same word. Leave visible spaces between “Will,” “you,” “be,” “my,” and “Valentine.”
Making Every Letter Too Decorative
Too many loops and flourishes can reduce readability. Decorate the capital letters or final stroke instead of altering every letter.
Uneven Letter Height
Lowercase letters such as a, e, i, m, n, o, and u should have similar height.
Oversized Descending Loops
The letters y in “you” and “my” extend below the baseline. Keep these loops controlled so they do not interfere with other text.
Forgetting the Dots and Crossbar
After completing the phrase, remember to dot the lowercase i letters and cross the t in “Valentine.”
Writing Too Quickly
Speed may cause unclear connections, inconsistent spacing, and shaky curves. Write slowly while learning.
Practice Tips for Better Cursive Writing
Improvement comes from repeating the same movements until they feel natural.
Practice Individual Words
Instead of writing the complete sentence repeatedly, practice one word at a time.
Write:
- Will
- you
- be
- my
- Valentine
Repeat each word five to ten times.
Use Lined Paper
Lined paper helps you control the baseline, letter height, and descending strokes.
Trace Before Writing Independently
Print or write a light cursive example, place tracing paper over it, and follow the stroke direction.
Warm Up Your Hand
Before writing the message, practice loops, curves, ovals, and connected humps.
Compare Your Attempts
Write the phrase several times and compare the results. Identify which letters appear uneven or difficult to read.
Relax Your Grip
Holding the pen too tightly can make your strokes shaky. Use a comfortable grip and move your hand smoothly across the page.
Printable Practice Format
You can create a simple worksheet by writing the phrase lightly several times and tracing it.
Use a practice pattern like this:
Will you be my Valentine?
Will you be my Valentine?
Will you be my Valentine?
Will you be my Valentine?
Start by tracing the first two lines. Then copy the phrase independently on the remaining lines.
You can also practice the difficult letter combinations separately:
- Wi
- ill
- yo
- ou
- my
- Va
- al
- len
- nti
- tine
Breaking the words into smaller combinations can improve control and confidence.
Different Cursive Styles You Can Try
There is no single correct way to write the phrase. Several cursive styles can work.
Traditional School Cursive
Traditional cursive uses clearly connected letters and familiar loop shapes. It is easy to read and suitable for beginners.
Modern Calligraphy
Modern calligraphy often uses thin upstrokes, thick downstrokes, and decorative capital letters. It can make Valentine’s Day cards look elegant.
Monoline Cursive
Monoline cursive uses strokes of the same thickness. It works well with ballpoint pens, gel pens, and fine-tip markers.
Bouncy Lettering
Bouncy lettering places some letters slightly above or below the normal baseline. This creates a playful handmade effect.
Faux Calligraphy
Write the phrase in regular cursive, then thicken the downward strokes by drawing a second line beside them. Fill the space between the lines to imitate brush calligraphy.
Valentine’s Day Message Ideas to Add
You can place a short message below your cursive question.
Examples include:
- You make every day brighter.
- Life is sweeter with you.
- I would love to spend Valentine’s Day with you.
- You are my favorite person.
- My heart is happiest with you.
- Every love story is special, but ours is my favorite.
- I hope your answer is yes.
- You mean more to me than words can say.
Keep the additional message smaller so the main cursive phrase remains the focus.
Frequently Asked Questions
Should Valentine Be Capitalized?
Yes. “Valentine” is commonly capitalized when it refers to a person being asked to become someone’s Valentine. Capitalizing it can also make the main word stand out in a decorative design.
Do I Need a Calligraphy Pen?
No. You can write “Will you be my Valentine” in cursive with a pencil, ballpoint pen, gel pen, marker, fountain pen, or brush pen.
Should Every Letter Be Connected?
Letters within each word are generally connected. Separate words should not be connected to one another.
Can I Write the Phrase in Faux Calligraphy?
Yes. Write it in ordinary cursive first, add extra width to the downstrokes, and fill them in. This creates a calligraphy-style result without requiring a brush pen.
How Can I Make My Writing Neater?
Use lined paper, write slowly, maintain consistent letter height, and practice difficult letters separately before writing the full sentence.
Can I Add Hearts Above the Letter I?
Yes. Replacing the dots above the lowercase i letters with small hearts is a popular decorative choice. Keep the hearts small so they do not distract from the words.
Is It Better to Write the Phrase on One or Two Lines?
Both layouts work. One line is suitable for wide cards, while a two-line layout gives you more space to make “Valentine” larger and more decorative.
Final Thoughts
Learning how to write will you be my Valentine in cursive can help you create a message that feels thoughtful, romantic, and personal. Begin by practicing each word separately, focus on smooth letter connections, and leave clear spaces between words.
The capital W and V can be slightly decorative, while the lowercase letters should remain consistent and readable. After mastering the basic phrase, add hearts, flourishes, color, shading, or a short personal note.
Your handwriting does not have to look perfect. The personal effort behind a handwritten Valentine message is what makes it memorable. Take your time, choose a comfortable pen, and create a version that reflects your own style.

Comments
0 responsesNo comments yet. Be the first to share your thoughts.